AntCTF x D^3CTF 2023|Misc Writeup
五一抽空玩了一下D3CTF,貌似又找回了当初的感觉🤤
d3readfile
读取Linux系统的敏感文件/proc/self/environ
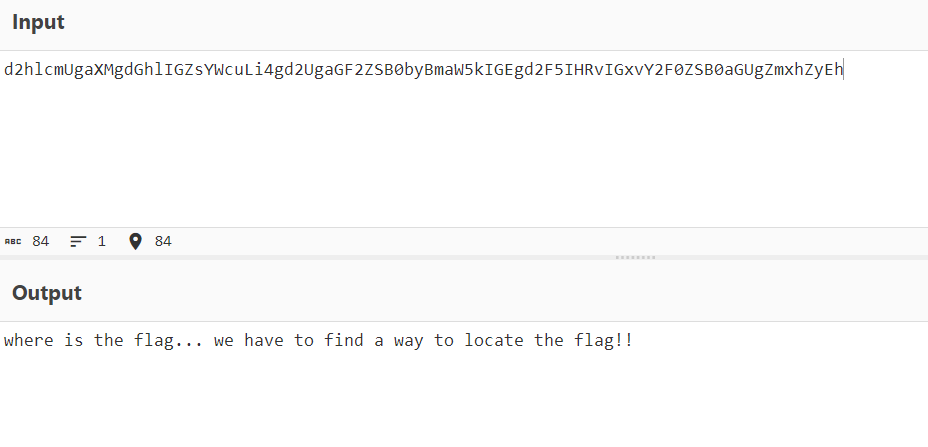
根据hint的提示locate flag
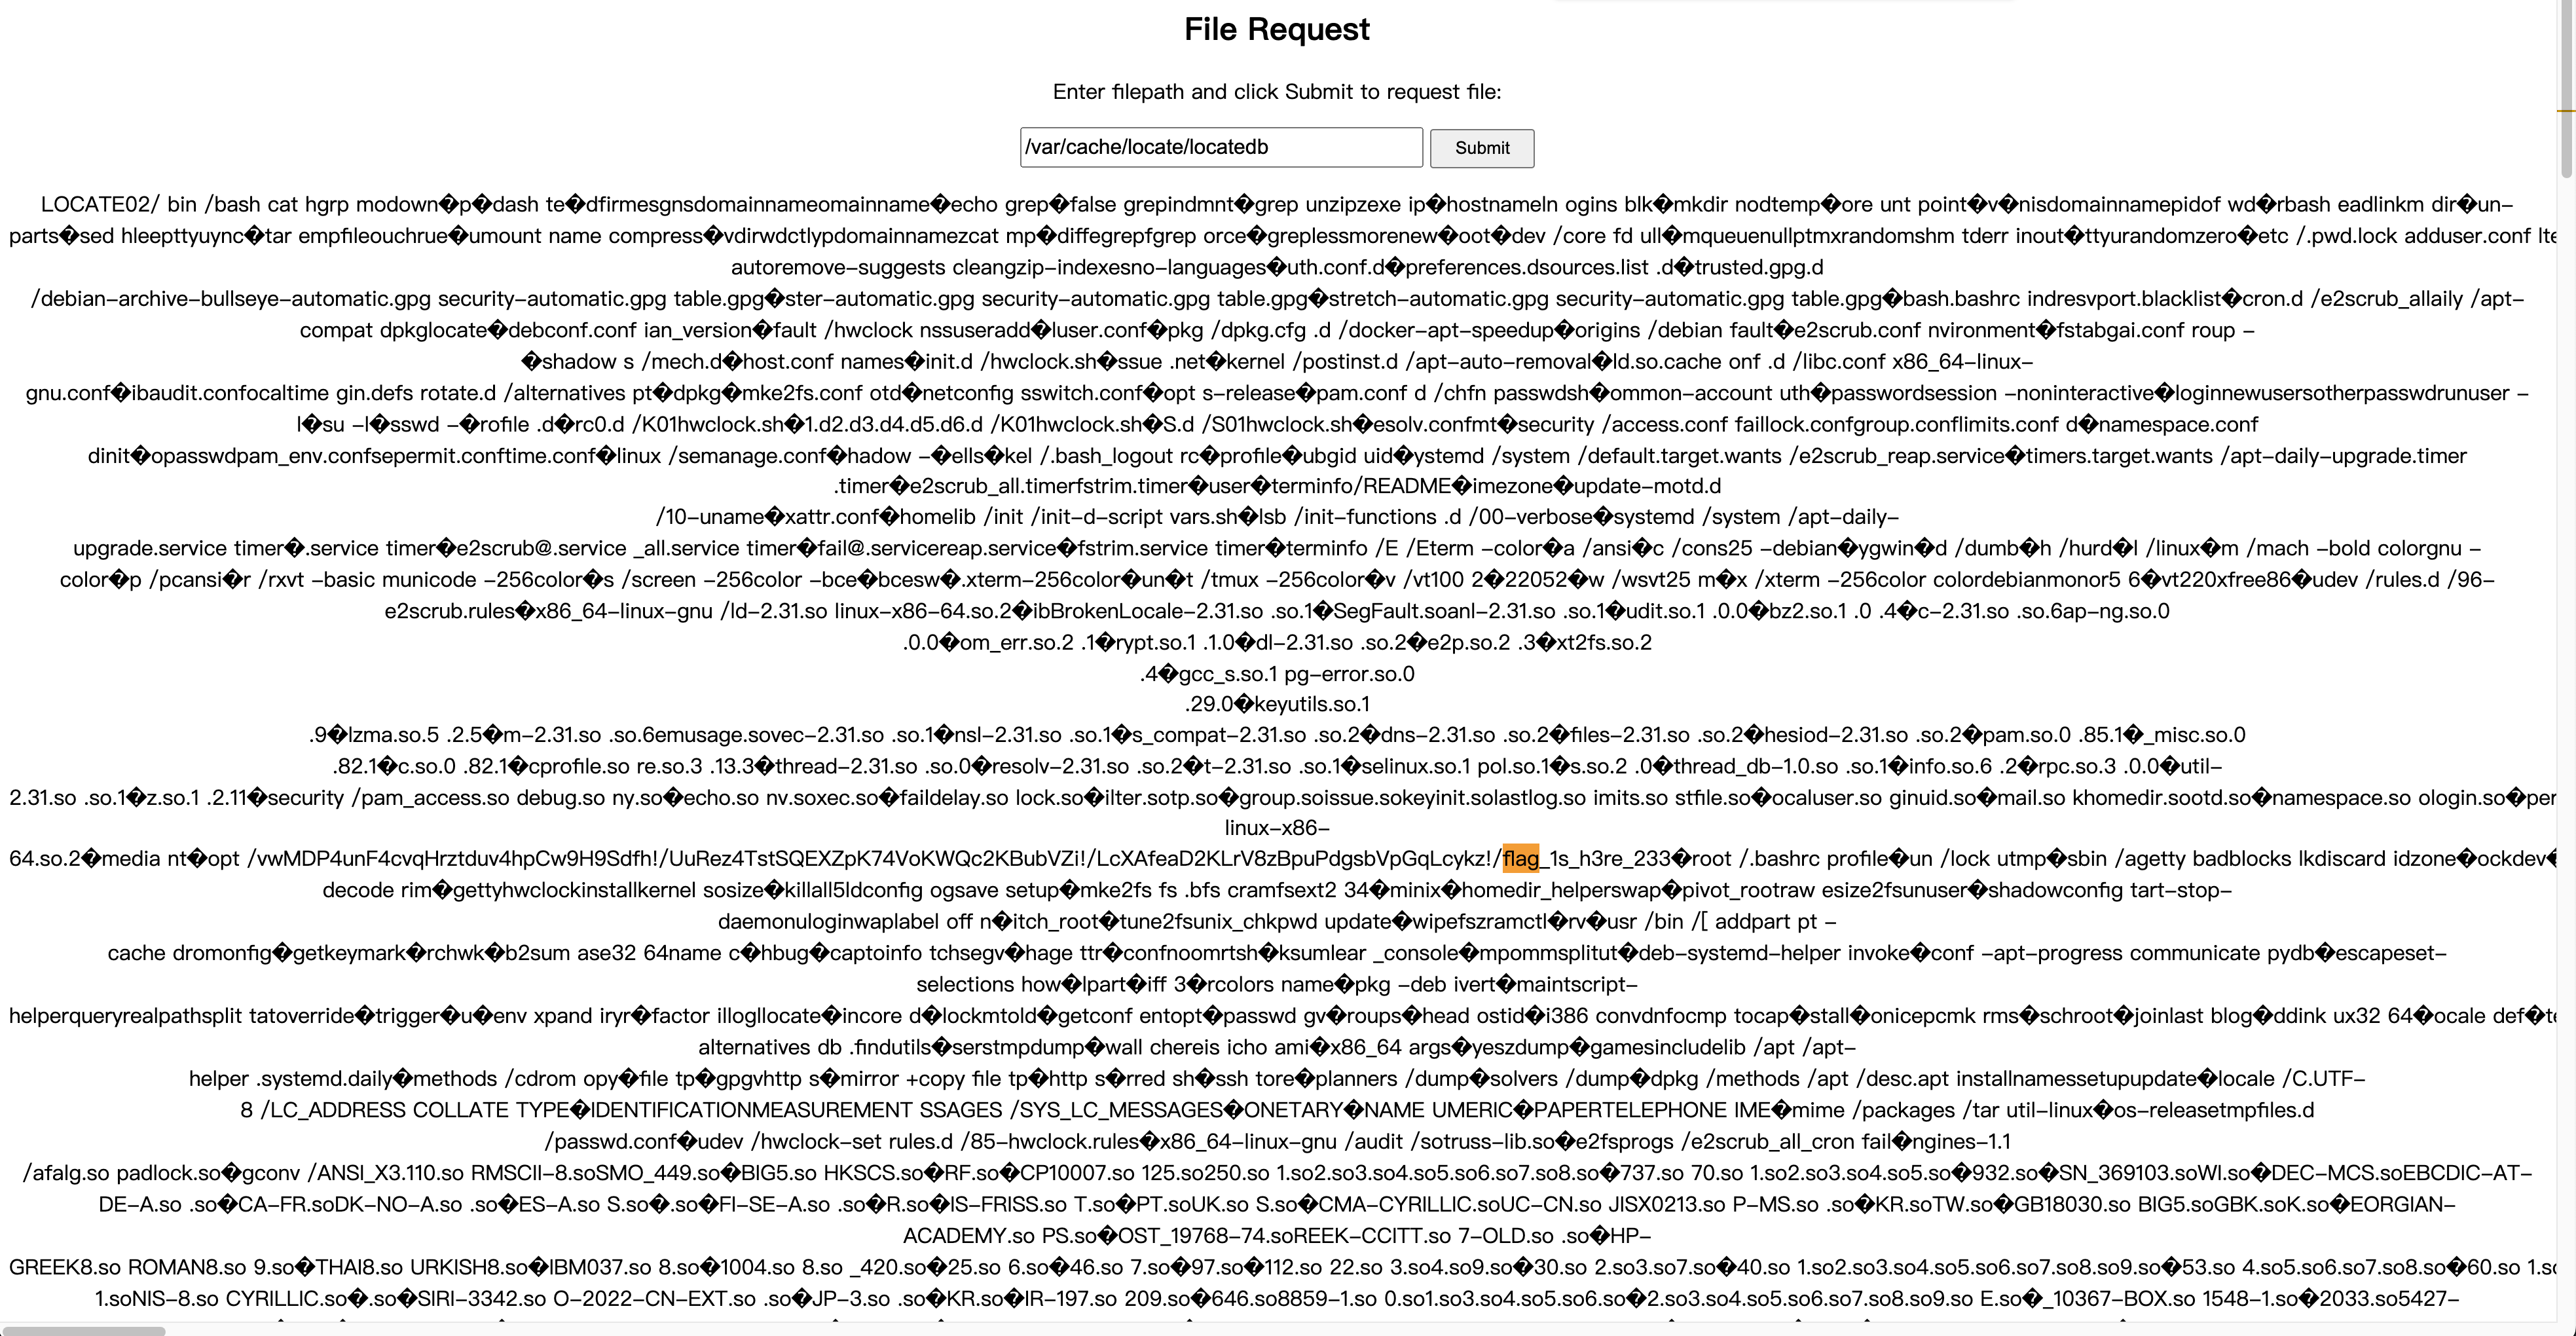
检索发现Linux当中有/var/cache/locate/locatedb数据库文件,里面存放了flag的文件目录,读取即可
d3gif
题目是一个GIF动图,名字是(x,y,bin).gif

GIF的考点无非两种:
- 时间
- 空间
提取图片每一帧的时间间隔发现都是0,那只能是空间的考点了,猜测是和之前国赛running_man类似的考点,需要提取每一帧图片不同位置的像素。
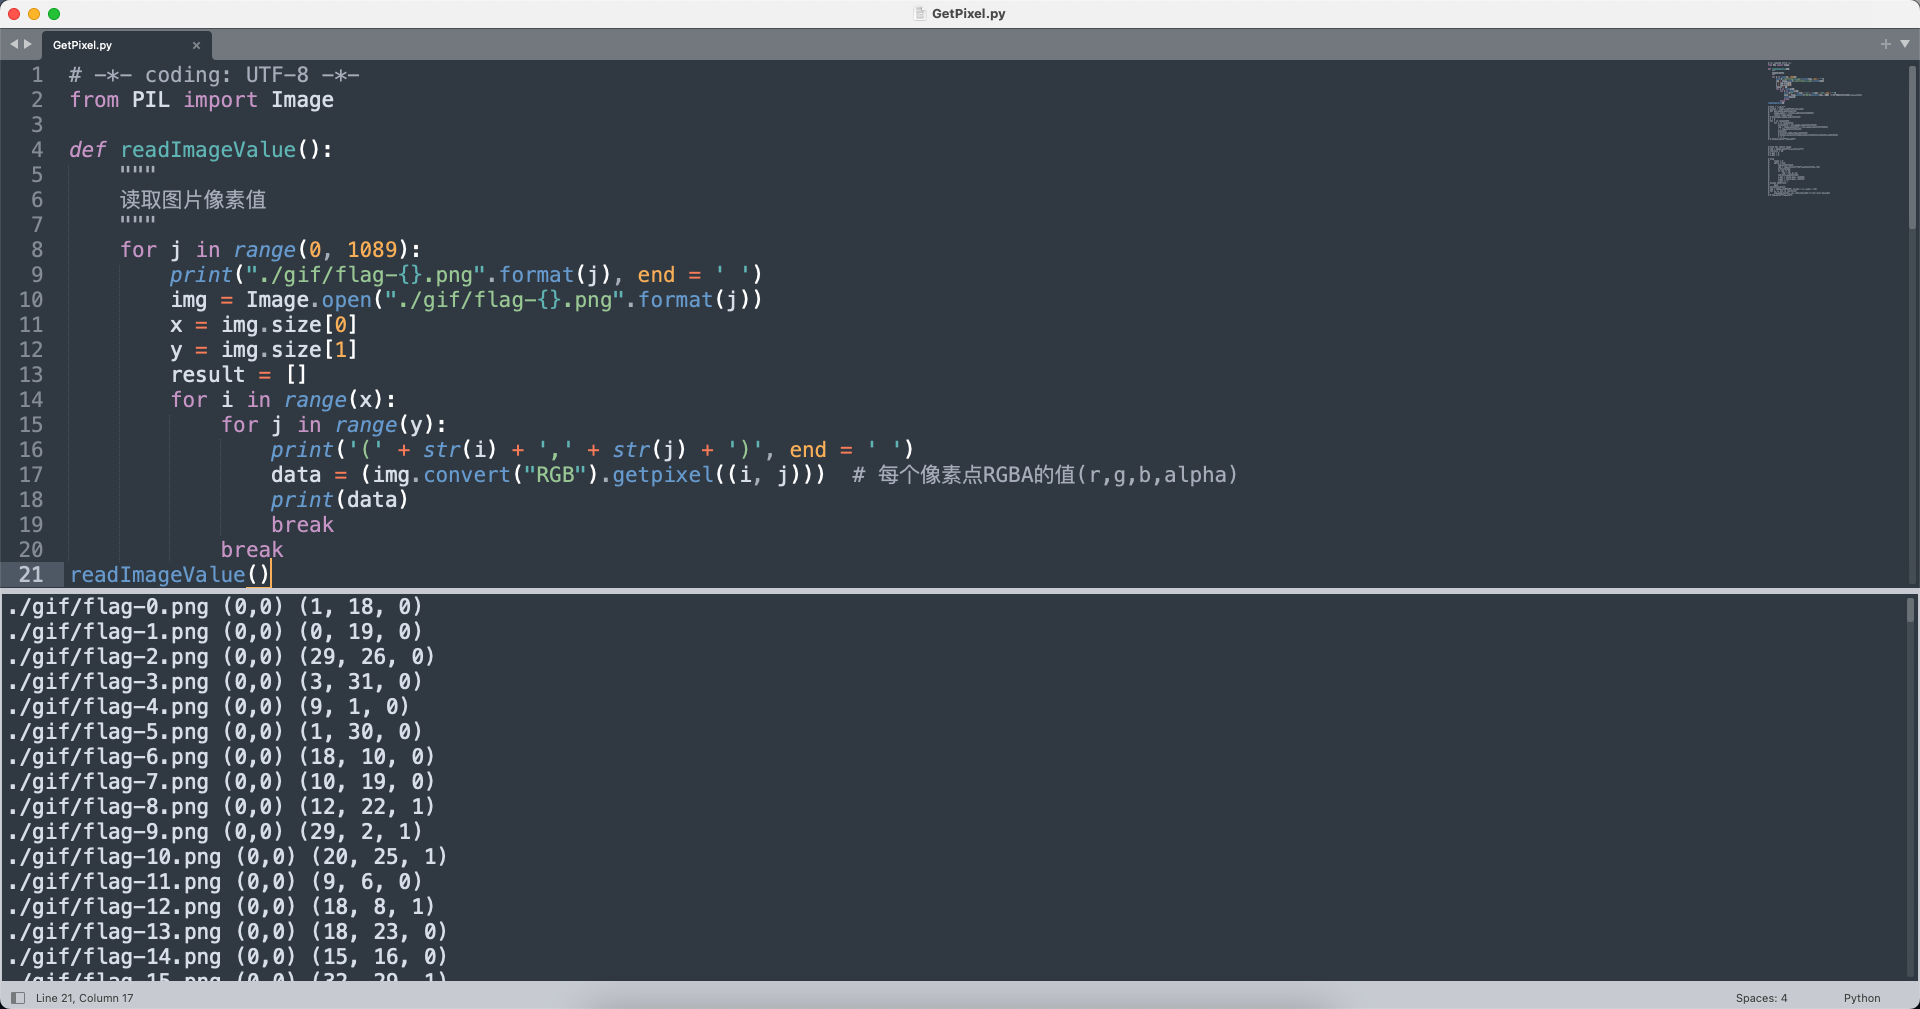
尝试之后发现不对劲,那么可以先把1089张图片所有像素点都提取出来,再逐个对比就好了。这里我把每一张图片(0,0)坐标的像素点提取出来做对比。
# -*- coding: UTF-8 -*-
from PIL import Image

def readImageValue():
    """
    读取图片像素值
    """
    for j in range(0, 1089):
        print("./gif/flag-{}.png".format(j), end = ' ')
        img = Image.open("./gif/flag-{}.png".format(j))
        x = img.size[0]
        y = img.size[1]
        result = []
        for i in range(x):
            for j in range(y):
                print('(' + str(i) + ',' + str(j) + ')', end = ' ')
                data = (img.convert("RGB").getpixel((i, j)))  # 每个像素点RGBA的值(r,g,b,alpha)
                print(data)
                break
            break
readImageValue()
(r, g, b)
(1, 18, 0)
(0, 19, 0)
(29, 26, 0)
(3, 31, 0)
(9, 1, 0)
(1, 30, 0)
(18, 10, 0)
(10, 19, 0)
(12, 22, 1)
(29, 2, 1)
(20, 25, 1)
(9, 6, 0)
(18, 8, 1)
(18, 23, 0)
(15, 16, 0)
(32, 29, 1)
(24, 8, 0)
(10, 7, 0)
(6, 17, 0)
(17, 25, 0)
(18, 6, 1)
(20, 28, 1)
(19, 29, 0)
(7, 19, 1)
(31, 31, 0)
(24, 25, 1)
(4, 9, 1)
(25, 1, 0)
...
提取之后发现一个共性,每一帧(0,0)坐标的像素点RGB的Blue通道不是0就是1,一共1089帧,那么很快可以联想到01绘制二维码(33x33规格),根据附件名称(x,y,bin),很显然Red和Green通道对应的就是xy坐标。
所以思路就是将每一帧图片(0,0)坐标像素点提取出来,再根据Red、Green通道的值当作xy坐标来画图,Blue通道的值来决定颜色(黑或者白)。
# -*- coding: UTF-8 -*-

from PIL import Image
img = Image.open('(x,y,bin).gif')
rgb = []

for i in range(1089):
	img.seek(i)
	data = img.convert("RGB").getpixel((0, 0))
	rgb.append(data)

flag = Image.new('RGB', (33, 33))

for j in rgb:
    flag.putpixel((j[0], j[1]), (j[2] * 255, j[2] * 255, j[2] * 255))

flag.save('result.png')
最终结果生成的二维码如下:

扫描结果:

antd3ctf{G1F_0R_C0L0R_0R_QRC0D3_0R_WHAT???}
d3image
附件给的是一个Linux系统的mem内存文件,需要先使用Volatility对内存取证分析。Linux系统的取证命令可以使用-h获取,网上的大多数文章都是Windows内存文件的取证命令。
Linux系统的profile制作完成之后就可以对内存文件进行分析啦。
Options:
  -h, --help            list all available options and their default values.
                        Default values may be set in the configuration file
                        (/etc/volatilityrc)
  --conf-file=/Users/yunoon/.volatilityrc
                        User based configuration file
  -d, --debug           Debug volatility
  --plugins=PLUGINS     Additional plugin directories to use (colon separated)
  --info                Print information about all registered objects
  --cache-directory=/Users/yunoon/.cache/volatility
                        Directory where cache files are stored
  --cache               Use caching
  --tz=TZ               Sets the (Olson) timezone for displaying timestamps
                        using pytz (if installed) or tzset
  -f FILENAME, --filename=FILENAME
                        Filename to use when opening an image
  --profile=LinuxUbuntu16x64
                        Name of the profile to load (use --info to see a list
                        of supported profiles)
  -l file:///Users/yunoon/Downloads/d3image-attachment/out.mem, --location=file:///Users/yunoon/Downloads/d3image-attachment/out.mem
                        A URN location from which to load an address space
  -w, --write           Enable write support
  --dtb=DTB             DTB Address
  --shift=SHIFT         Mac KASLR shift address
  --output=text         Output in this format (support is module specific, see
                        the Module Output Options below)
  --output-file=OUTPUT_FILE
                        Write output in this file
  -v, --verbose         Verbose information
  --physical_shift=PHYSICAL_SHIFT
                        Linux kernel physical shift address
  --virtual_shift=VIRTUAL_SHIFT
                        Linux kernel virtual shift address
  -g KDBG, --kdbg=KDBG  Specify a KDBG virtual address (Note: for 64-bit
                        Windows 8 and above this is the address of
                        KdCopyDataBlock)
  --force               Force utilization of suspect profile
  --cookie=COOKIE       Specify the address of nt!ObHeaderCookie (valid for
                        Windows 10 only)
  -k KPCR, --kpcr=KPCR  Specify a specific KPCR address

	Supported Plugin Commands:

		imagecopy      	Copies a physical address space out as a raw DD image
		limeinfo       	Dump Lime file format information
		linux_apihooks 	Checks for userland apihooks
		linux_arp      	Print the ARP table
		linux_aslr_shift	Automatically detect the Linux ASLR shift
		linux_banner   	Prints the Linux banner information
		linux_bash     	Recover bash history from bash process memory
		linux_bash_env 	Recover a process' dynamic environment variables
		linux_bash_hash	Recover bash hash table from bash process memory
		linux_check_afinfo	Verifies the operation function pointers of network protocols
		linux_check_creds	Checks if any processes are sharing credential structures
		linux_check_fop	Check file operation structures for rootkit modifications
		linux_check_idt	Checks if the IDT has been altered
		linux_check_inline_kernel	Check for inline kernel hooks
		linux_check_modules	Compares module list to sysfs info, if available
		linux_check_syscall	Checks if the system call table has been altered
		linux_check_tty	Checks tty devices for hooks
		linux_cpuinfo  	Prints info about each active processor
		linux_dentry_cache	Gather files from the dentry cache
		linux_dmesg    	Gather dmesg buffer
		linux_dump_map 	Writes selected memory mappings to disk
		linux_dynamic_env	Recover a process' dynamic environment variables
		linux_elfs     	Find ELF binaries in process mappings
		linux_enumerate_files	Lists files referenced by the filesystem cache
		linux_find_file	Lists and recovers files from memory
		linux_getcwd   	Lists current working directory of each process
		linux_hidden_modules	Carves memory to find hidden kernel modules
		linux_ifconfig 	Gathers active interfaces
		linux_info_regs	It's like 'info registers' in GDB. It prints out all the
		linux_iomem    	Provides output similar to /proc/iomem
		linux_kernel_opened_files	Lists files that are opened from within the kernel
		linux_keyboard_notifiers	Parses the keyboard notifier call chain
		linux_ldrmodules	Compares the output of proc maps with the list of libraries from libdl
		linux_library_list	Lists libraries loaded into a process
		linux_librarydump	Dumps shared libraries in process memory to disk
		linux_list_raw 	List applications with promiscuous sockets
		linux_lsmod    	Gather loaded kernel modules
		linux_lsof     	Lists file descriptors and their path
		linux_malfind  	Looks for suspicious process mappings
		linux_memmap   	Dumps the memory map for linux tasks
		linux_moddump  	Extract loaded kernel modules
		linux_mount    	Gather mounted fs/devices
		linux_mount_cache	Gather mounted fs/devices from kmem_cache
		linux_netfilter	Lists Netfilter hooks
		linux_netscan  	Carves for network connection structures
		linux_netstat  	Lists open sockets
		linux_pidhashtable	Enumerates processes through the PID hash table
		linux_pkt_queues	Writes per-process packet queues out to disk
		linux_plthook  	Scan ELF binaries' PLT for hooks to non-NEEDED images
		linux_proc_maps	Gathers process memory maps
		linux_proc_maps_rb	Gathers process maps for linux through the mappings red-black tree
		linux_procdump 	Dumps a process's executable image to disk
		linux_process_hollow	Checks for signs of process hollowing
		linux_psaux    	Gathers processes along with full command line and start time
		linux_psenv    	Gathers processes along with their static environment variables
		linux_pslist   	Gather active tasks by walking the task_struct->task list
		linux_pslist_cache	Gather tasks from the kmem_cache
		linux_psscan   	Scan physical memory for processes
		linux_pstree   	Shows the parent/child relationship between processes
		linux_psxview  	Find hidden processes with various process listings
		linux_recover_filesystem	Recovers the entire cached file system from memory
		linux_route_cache	Recovers the routing cache from memory
		linux_sk_buff_cache	Recovers packets from the sk_buff kmem_cache
		linux_slabinfo 	Mimics /proc/slabinfo on a running machine
		linux_strings  	Match physical offsets to virtual addresses (may take a while, VERY verbose)
		linux_threads  	Prints threads of processes
		linux_tmpfs    	Recovers tmpfs filesystems from memory
		linux_truecrypt_passphrase	Recovers cached Truecrypt passphrases
		linux_vma_cache	Gather VMAs from the vm_area_struct cache
		linux_volshell 	Shell in the memory image
		linux_yarascan 	A shell in the Linux memory image
		mbrparser      	Scans for and parses potential Master Boot Records (MBRs)
		patcher        	Patches memory based on page scans
		raw2dmp        	Converts a physical memory sample to a windbg crash dump
		vmwareinfo     	Dump VMware VMSS/VMSN information
首先可以看看跑了哪些进程以及bash历史命令。
volatility -f out.mem --profile=LinuxUbuntu16x64 linux_bash
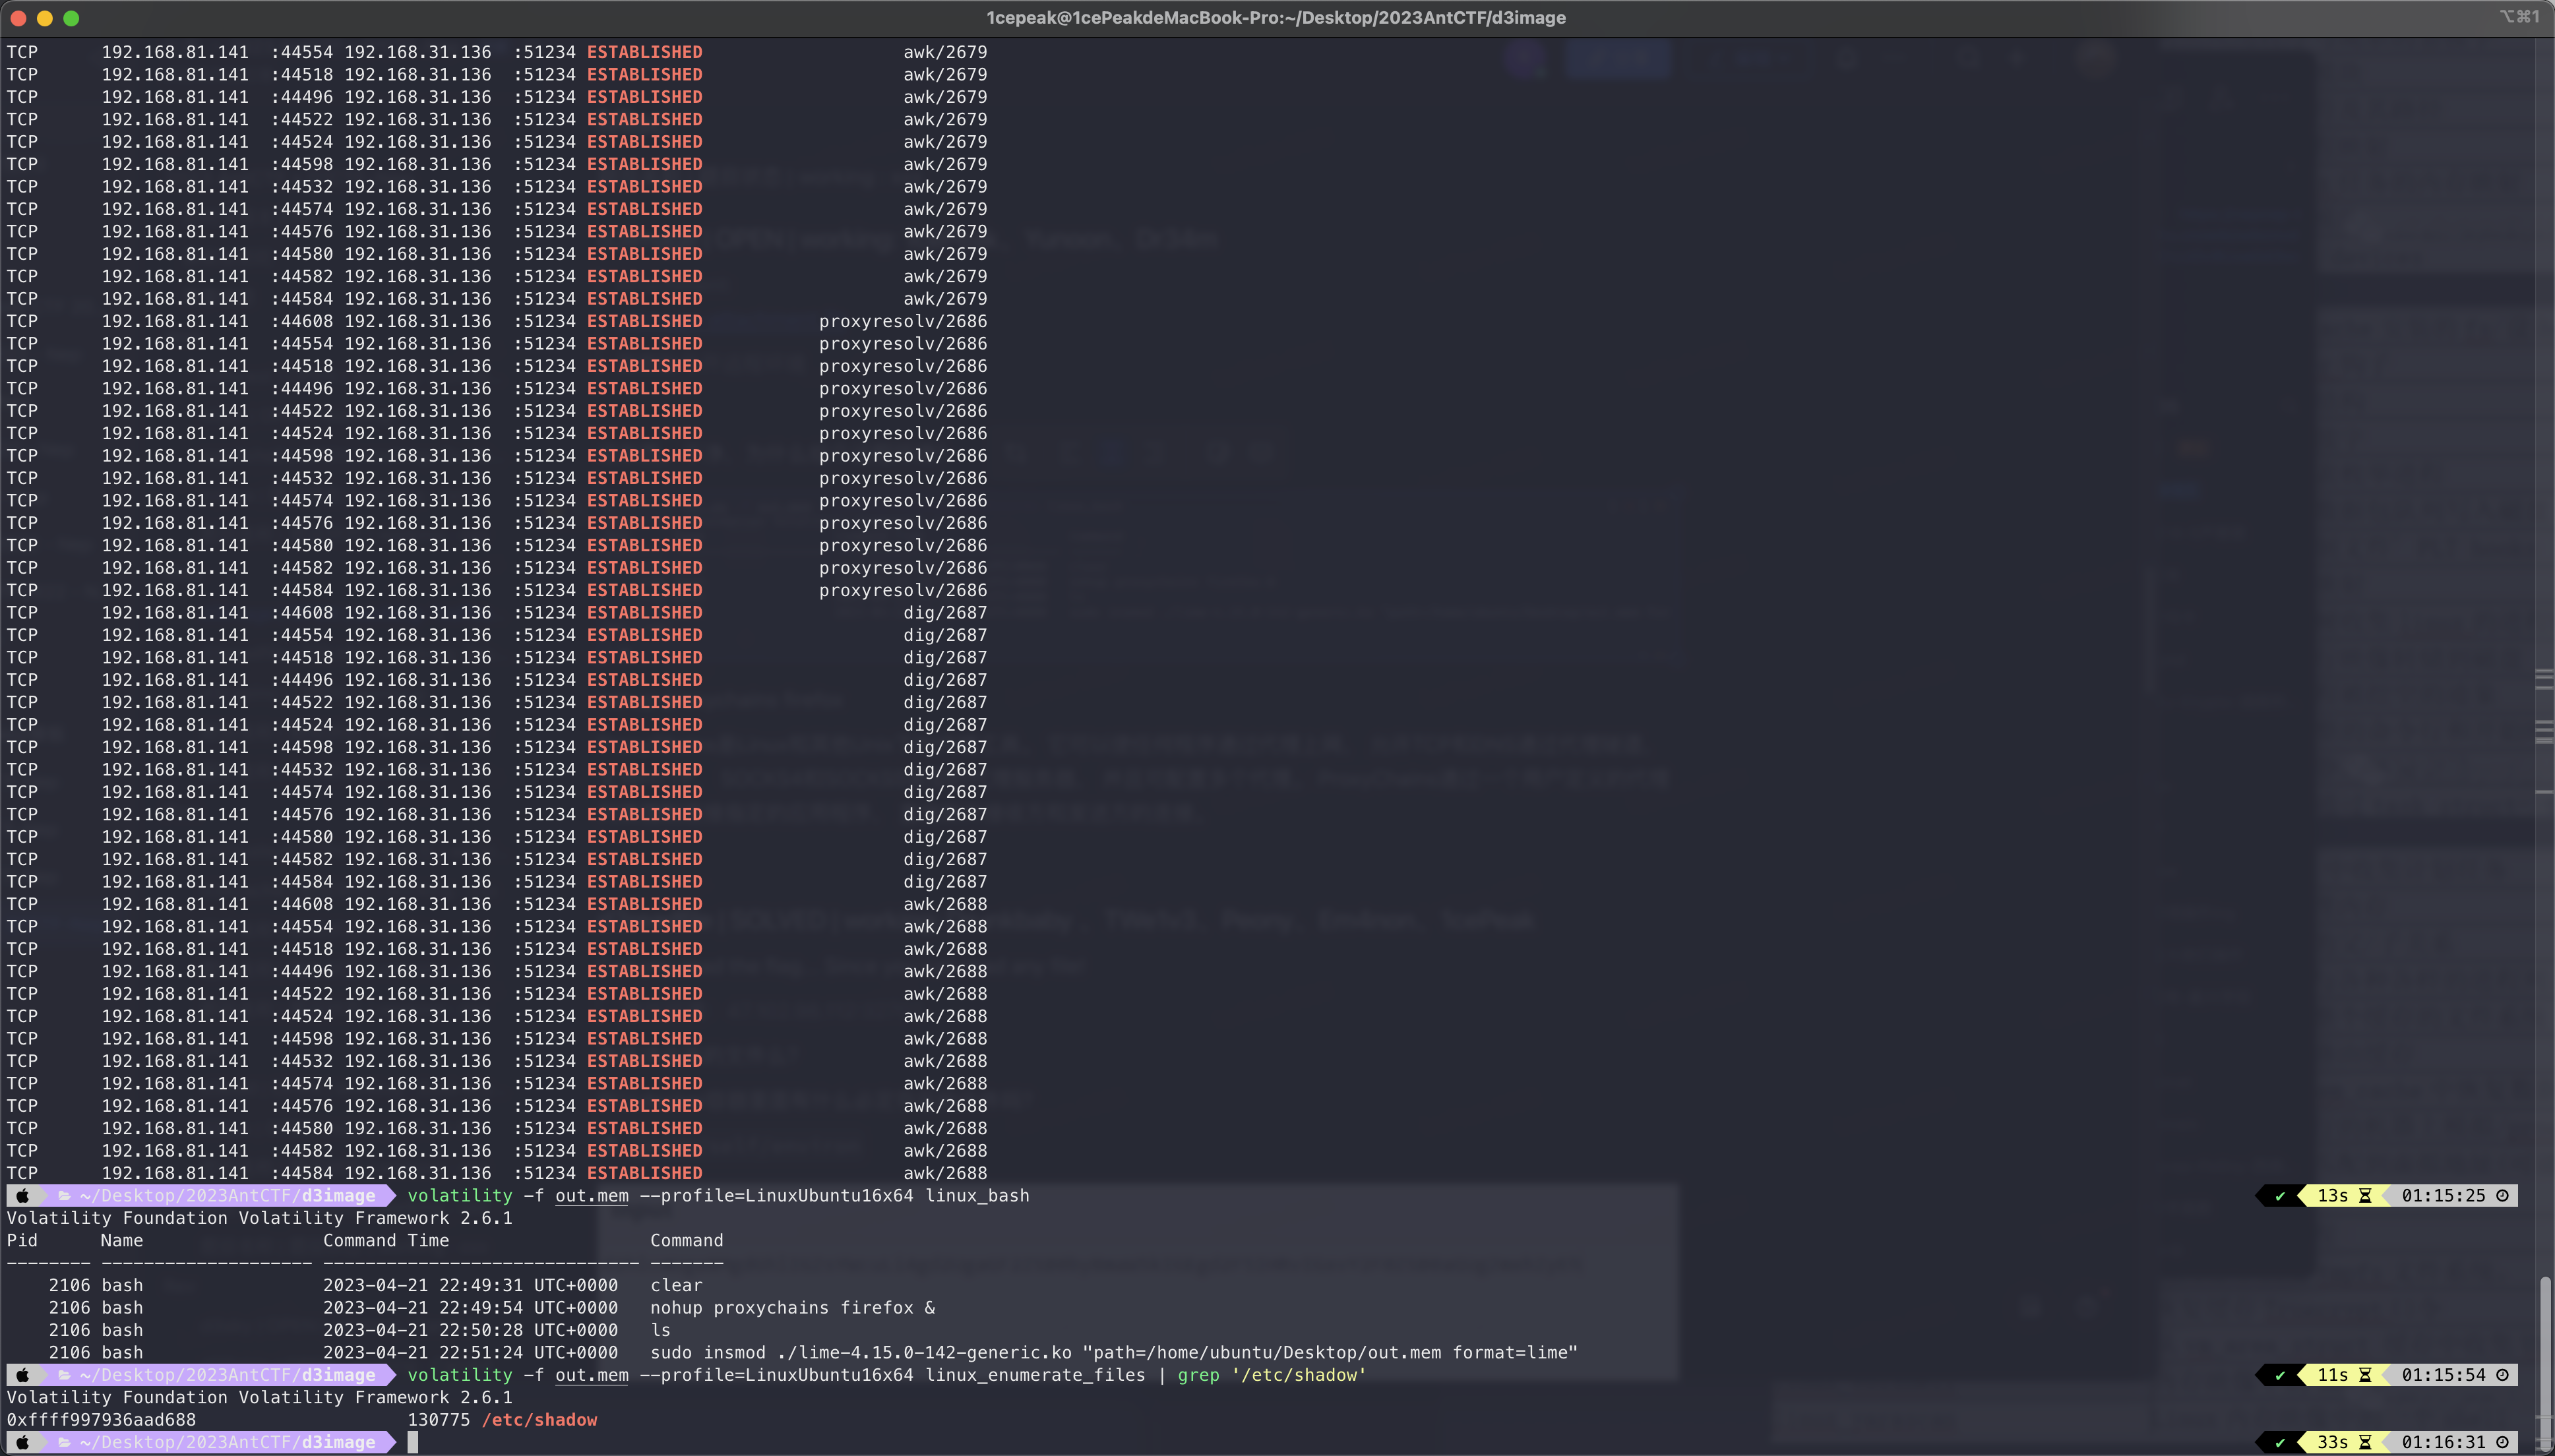
可以看到一条nohup proxychains firefox &的命令。
ProxyChains是Linux和其他Unix下的代理工具。 它可以使任何程序通过代理上网, 允许TCP和DNS通过代理隧道, 支持HTTP、 SOCKS4和SOCKS5类型的代理服务器, 并且可配置多个代理。 ProxyChains通过一个用户定义的代理列表强制连接指定的应用程序, 直接断开接收方和发送方的连接。
我们可以先读取一下proxychains的配置文件,尝试获取账号密码等信息。
volatility -f out.mem --profile=LinuxUbuntu16x64 linux_enumerate_files | grep 'proxychains.conf'
Volatility Foundation Volatility Framework 2.6.1
0xffff9978bb96ebf0                    147170 /etc/proxychains.conf
发现存在该配置文件,然后再使用linux_find_file将它dump出来。
volatility -f out.mem --profile=LinuxUbuntu16x64 linux_find_file -i 0xffff9978bb96ebf0 -O proxychains.conf
打开之后发现存在配置好的账号密码:
[ProxyList]
# add proxy here ...
# meanwile
# defaults set to "tor"
socks5 	192.168.31.136 51234 Gigantic_Splight Tearalaments_Kitkalos
之后我们在本地配置socks5代理连接题目靶机。
socks5 ip:port Gigantic_Splight Tearalaments_Kitkalos, ip/port即为提供的ip/port
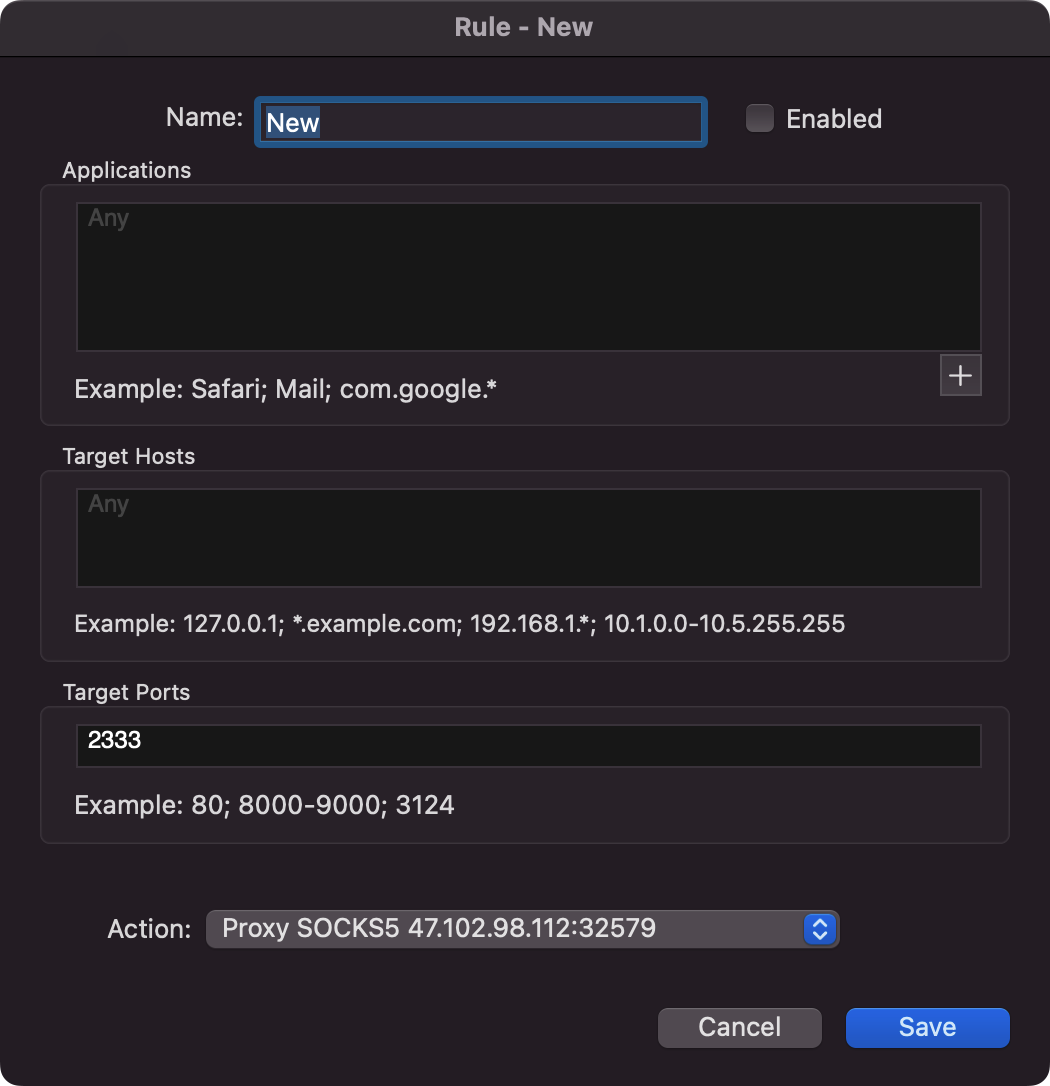
连上后,proxifier配置路由规则,访问127.0.0.1:2333
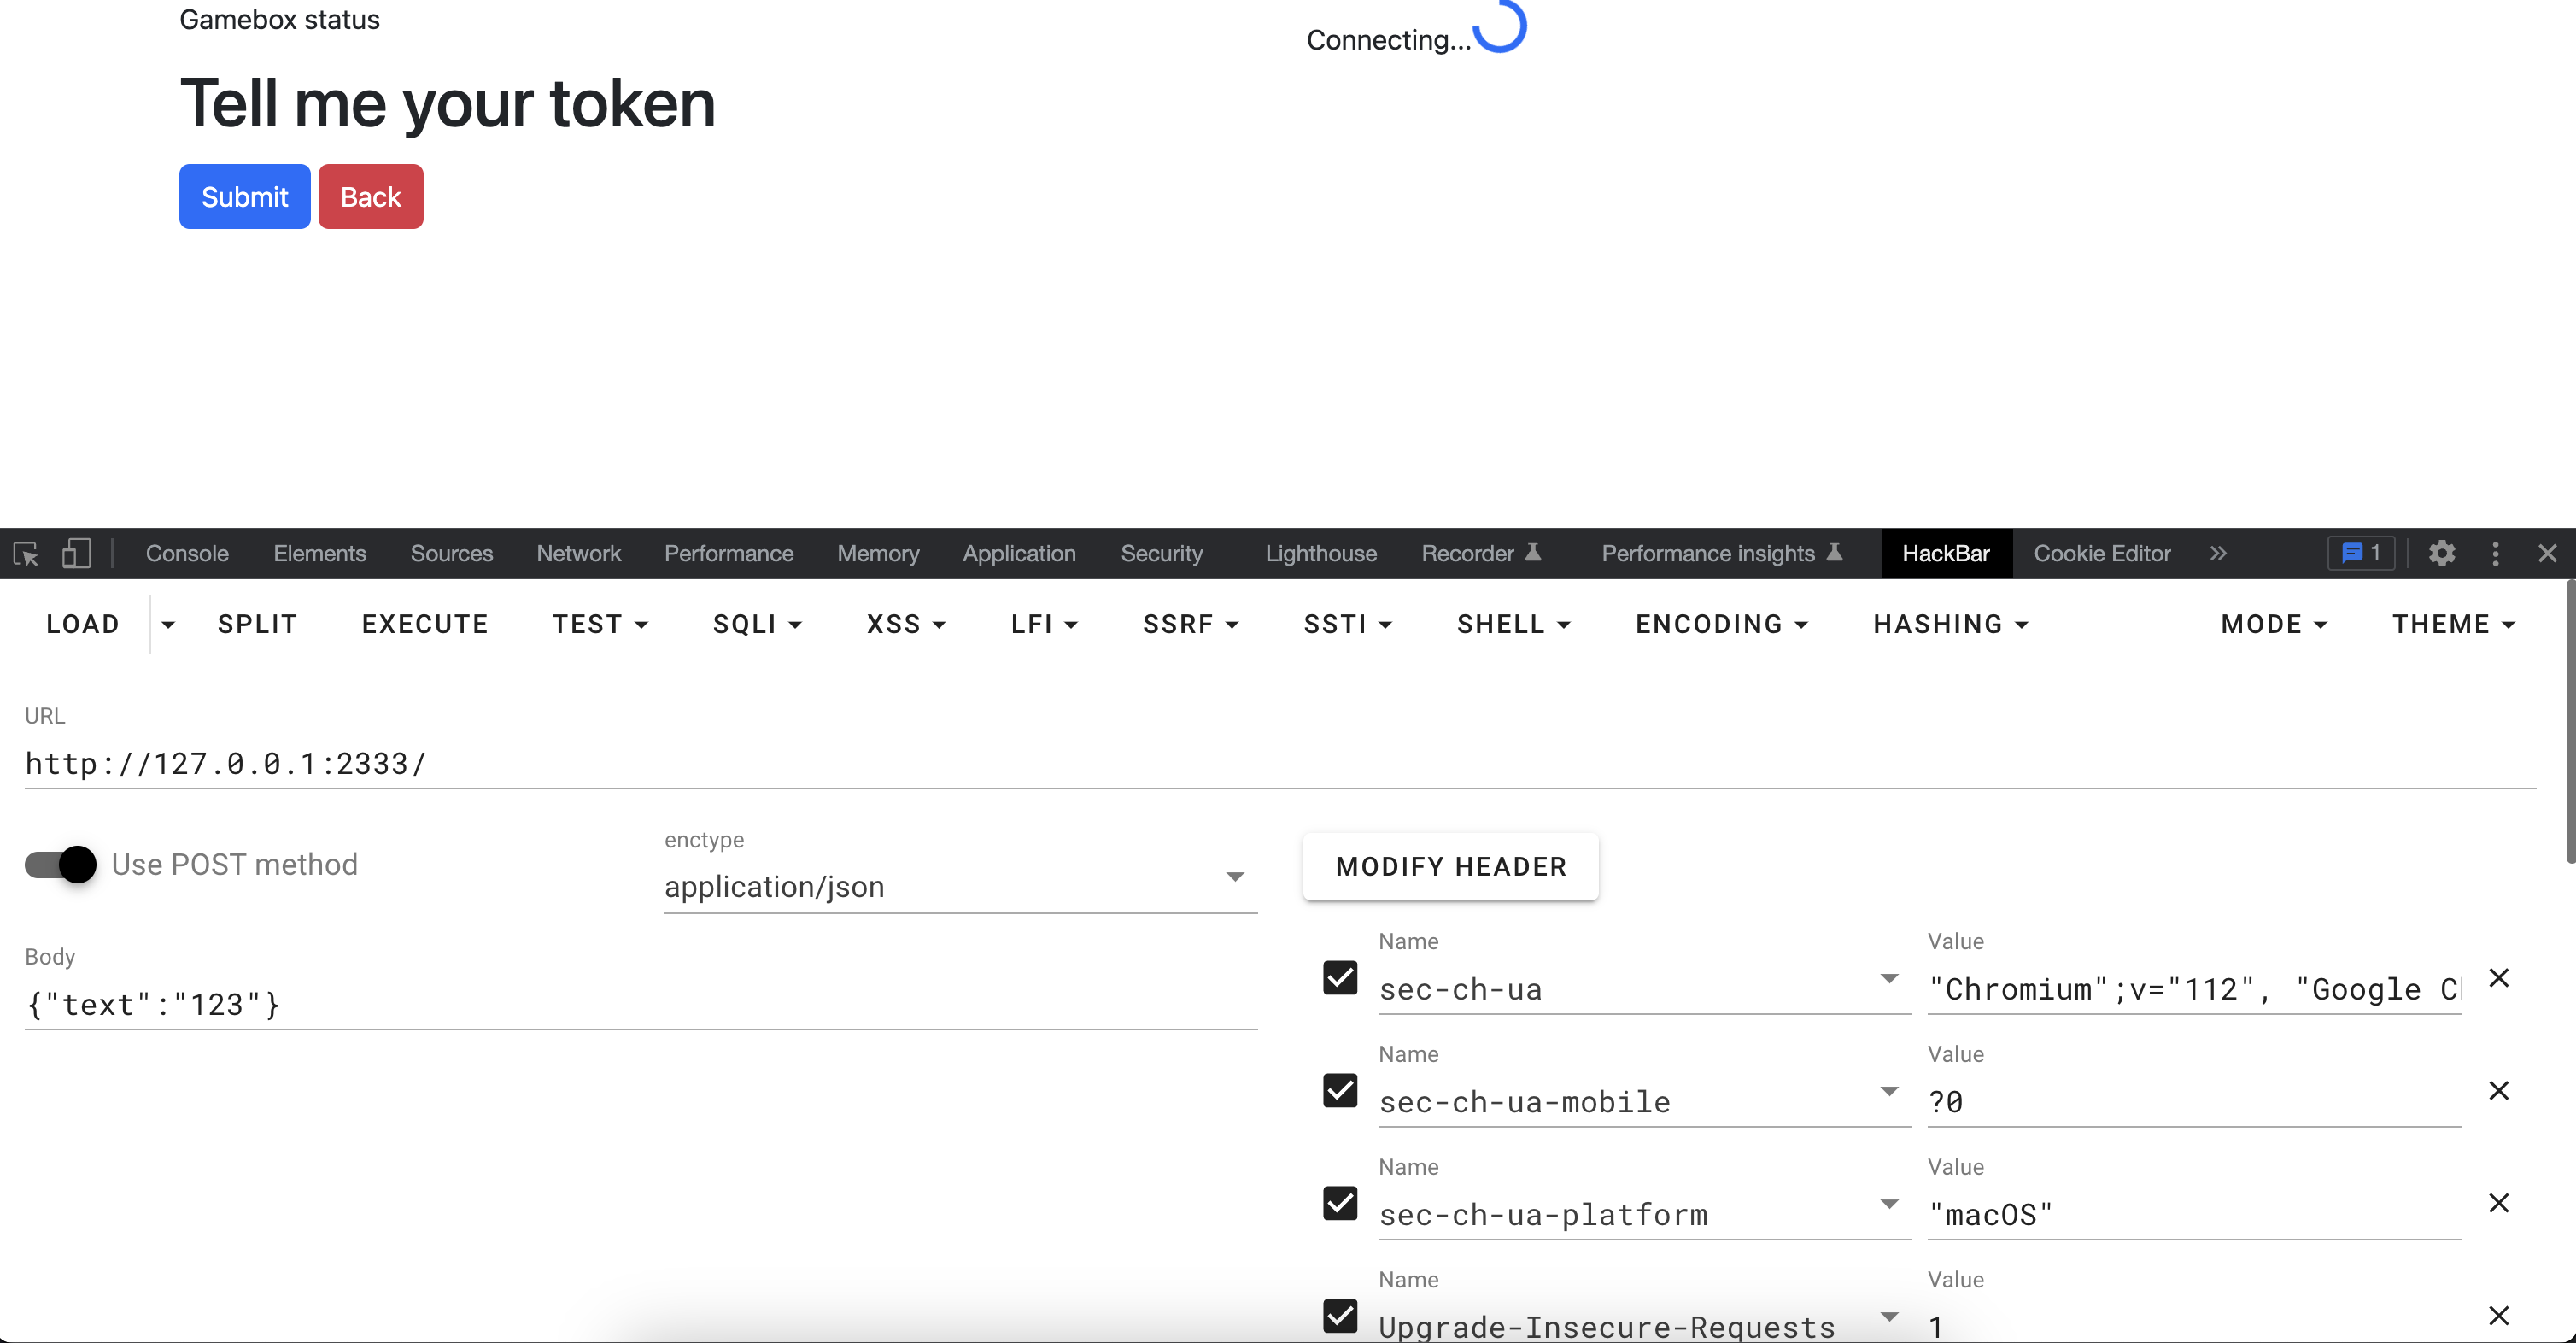
发现需要token,在这里卡了很久,尝试多次后发现直接strings该内存文件可以发现端倪。
strings out.mem | grep 127.0.0.1:2333
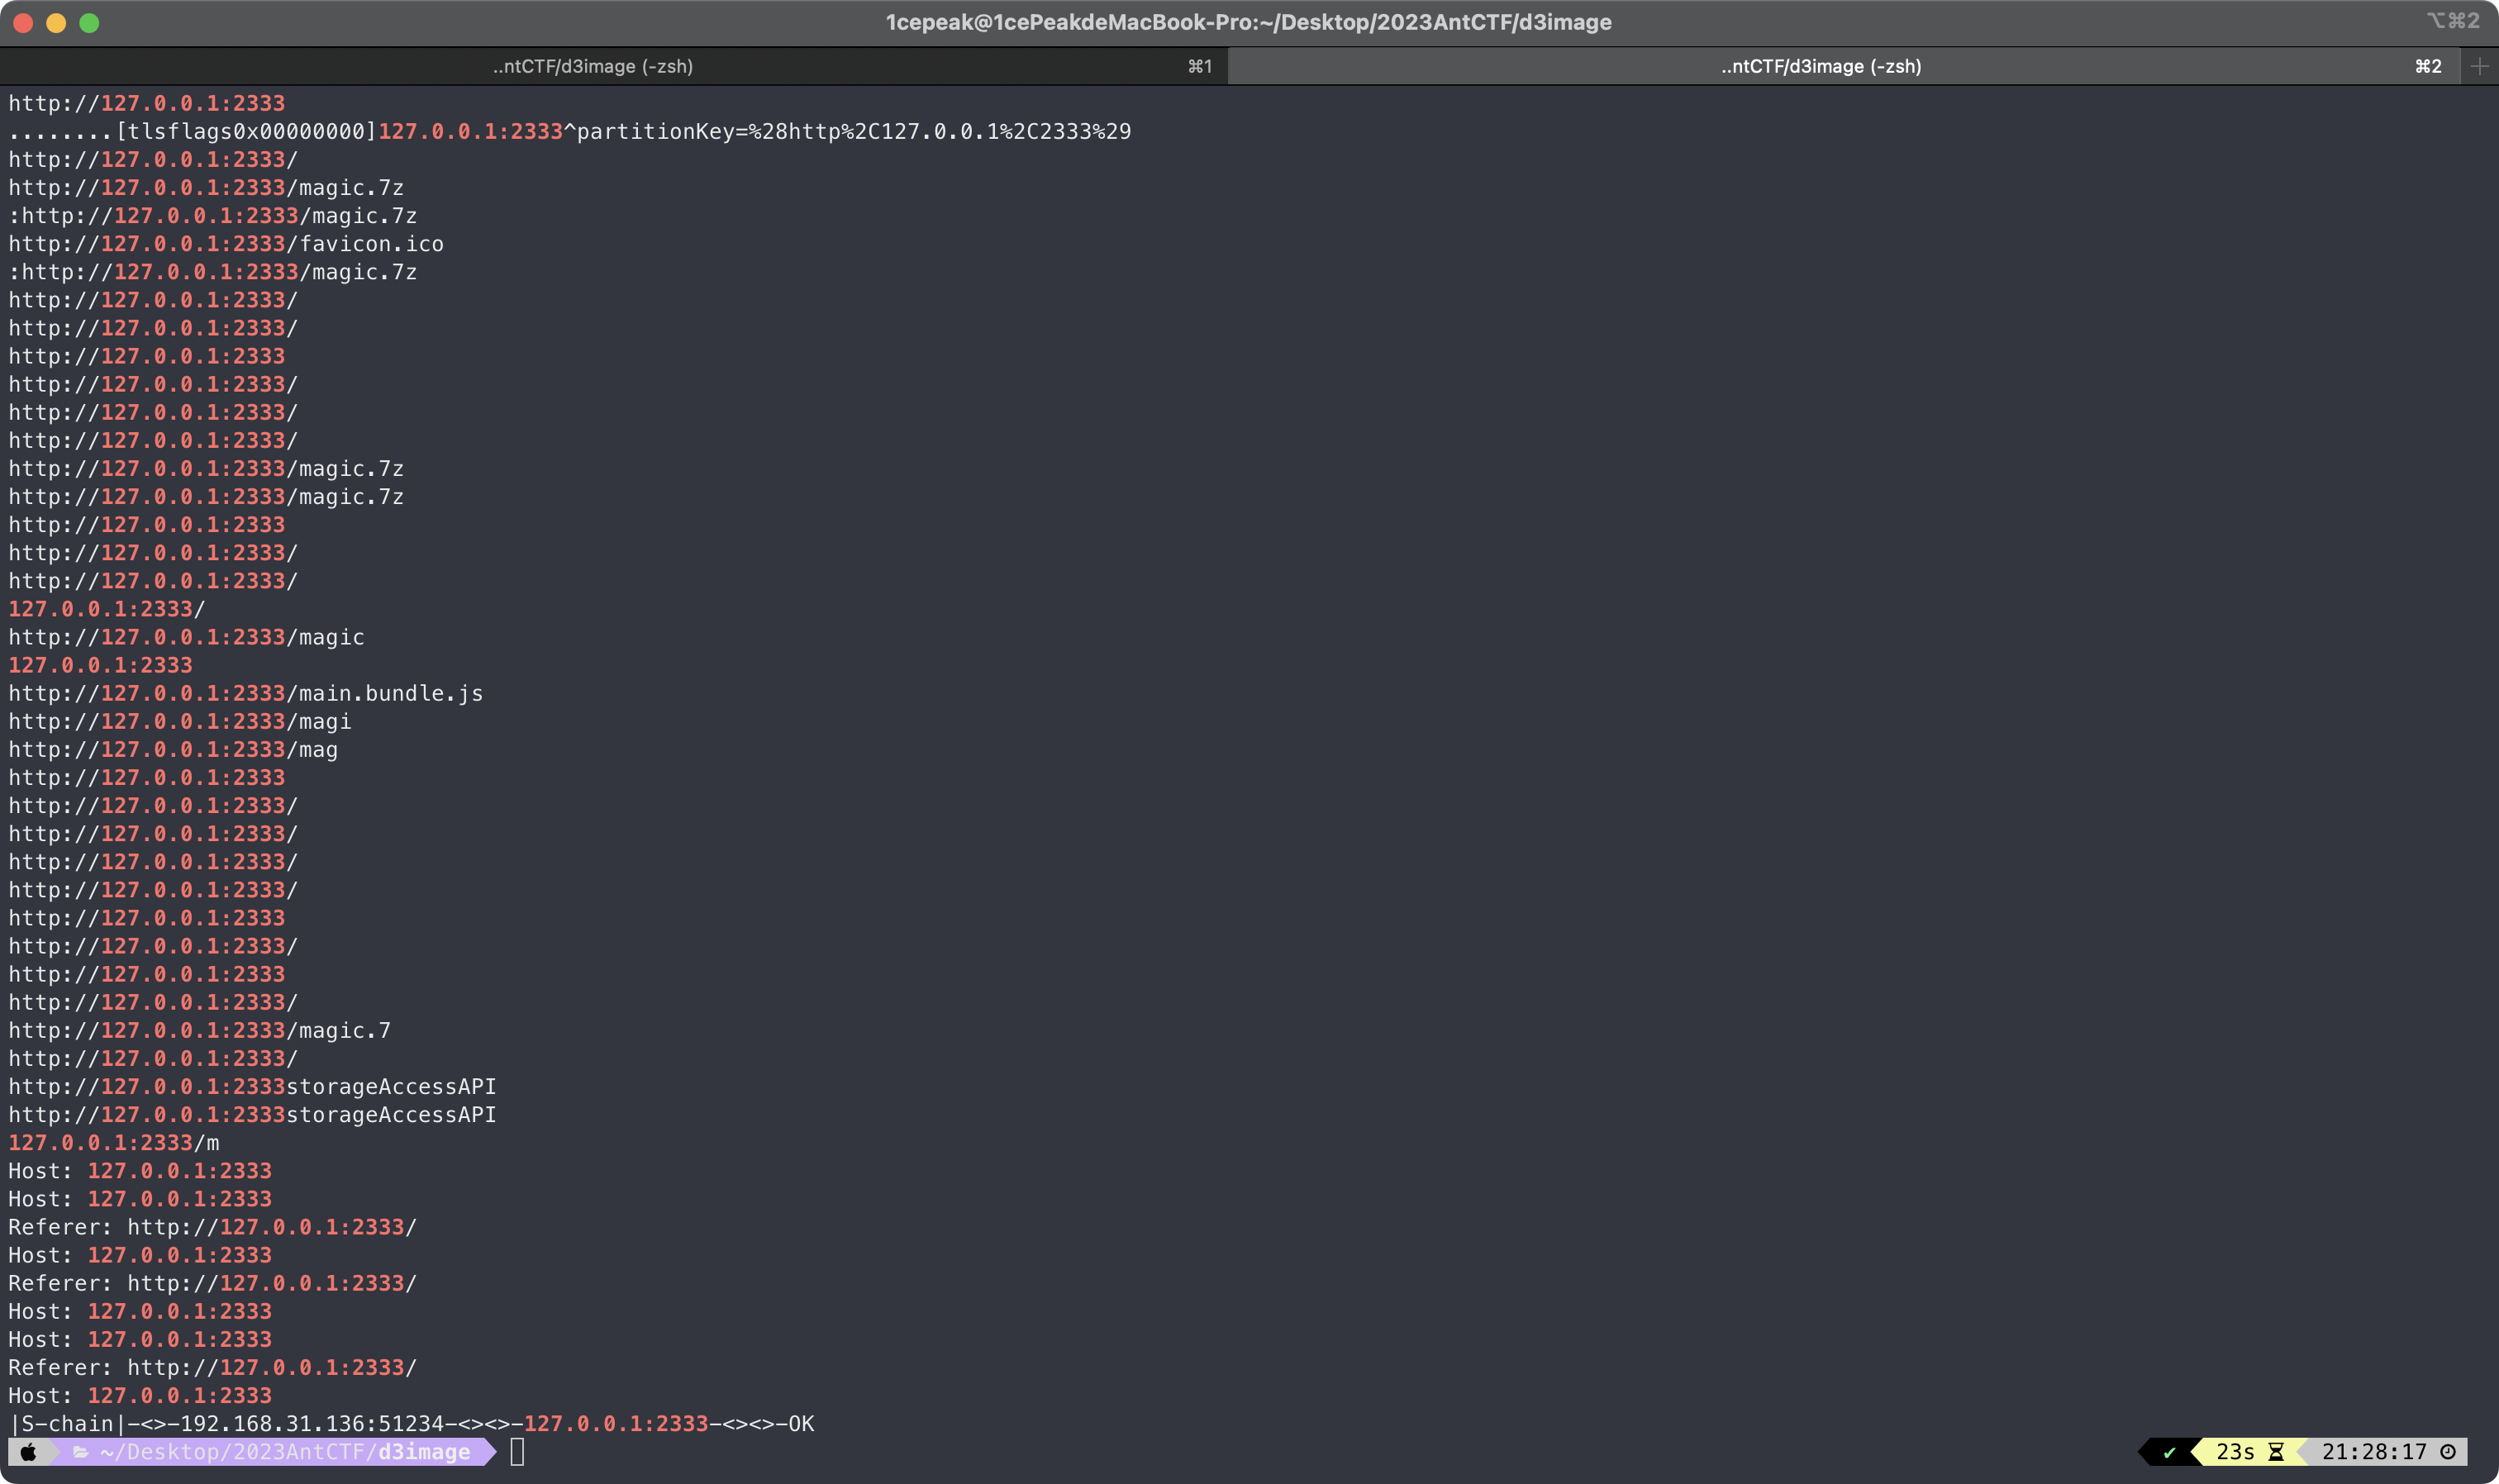
访问/magic.7z可以拿到该文件,打开后发现是一个流量包,看了一下流量包的报文都是查询报文,但是code只有0、3。
到目前为止,猜测可以看看dst ip和返回包的状态,然后有一个ip是可以访问拿到token的。折腾了一晚上发现没有什么用,倒是第一次见证了北京从黑夜到清晨的全貌。
第二天有了新的想法,把ip和返回包状态提取出来,ip从小到大排序,然后根据是否可达转为01。
tshark -r magic.pcap -Y "(icmp.code == 0 or icmp.code == 3) and icmp.type == 0" -T fields -e ip.dst -e icmp.code | awk '{if ($2 == "0") {print $1" 0"} else {print $1" 1"}}' | sort -k 1,1n > output.txt
最终由@ThTsOdT神写了一版完整的提取脚本出来:
import struct

f = open("magic.pcap","rb")
f.read(24)
data = f.read()

D = bytearray(5038056)
data_len = len(data)
offset = 0

def procees1(num,status):
    unreachable = status & 0x00030000
    realstatus = (status & 0xFFFF0000) >> 16
    if(D[num] == 0):
        D[num] = 0x30
    elif(D[num] == 0x30 and (not unreachable)):
        D[num] = 0x31
    elif(D[num] == 0x31):
        D[num] = 0x41
        print("??",num)

def procees4(num,status):
    unreachable = status & 0x00030000
    realstatus = (status & 0xFFFF0000) >> 16
    if(realstatus == 0x0800 and D[num] == 0):
        D[num] = 0x30
    elif(realstatus == 0x0000 and D[num] == 0x30):
        D[num] = 0x31
    elif(realstatus == 0x0003 and D[num] == 0x30):
        D[num] = 0x30

def procees2(num,status):
    unreachable = status & 0x00030000
    realstatus = (status & 0xFFFF0000) >> 16
    if(realstatus == 0x0800):
        D[num] = 0x30
    if(realstatus == 0x0003):
        D[num] = 0x31
    if(realstatus == 0x0000):
        D[num] = 0x30

def procees3(num,status):
    unreachable = status & 0x00030000
    realstatus = (status & 0xFFFF0000) >> 16
    if(D[num] == 0):
        D[num] = 0x31
    if(D[num] == 0x31 and realstatus == 0x0800):
        D[num] = 0x30
    if(realstatus == 0x0003):
        D[num] = 0x30
    if(realstatus == 0x0000):
        D[num] = 0x31

while(offset < data_len):
    R = struct.unpack_from(">IIIIIIIIIII",data,offset)
    offset += 44
    dst = R[8]
    status = R[9]
    #0800 request
    #0003 unreachable
    #0000 reachable

    num = dst &  0x00FFFFFF
    procees4(num,status)

for i in range(len(D)):
    if(D[i] == 0):
        D[i] = 0x30

f = open("Q9","wb")
f.write(D)
f.close()
得到7z压缩包,解压后是3d模型文件:

然后透视可以看到里面有二维码:

用010editor加载,观察到文件最后的部分,y轴为40,去除这一部分:
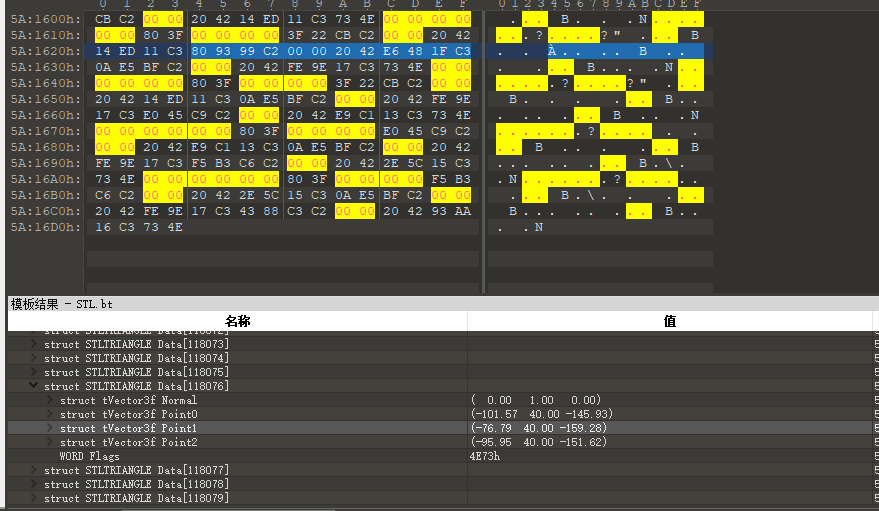
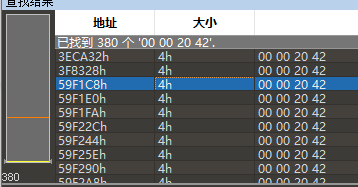
修改总数:

去除后,发现脱掉了半个外壳,查看二维码:

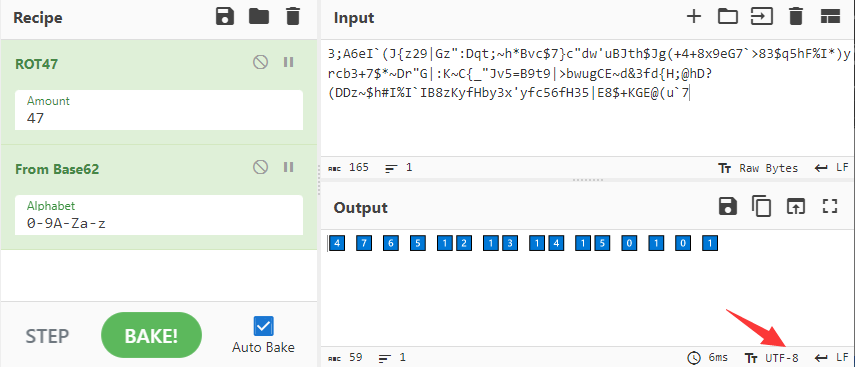
3;A6eI`(J{z29|Gz":Dqt;~h*Bvc$7}c"dw'uBJth$Jg(+4+8x9eG7`>83$q5hF%I*)yrcb3+7$*~Dr"G|:K~C{_"Jv5=B9t9|>bwugCE~d&3fd{H;@hD?(DDz~$h#I%I`IB8zKyfHby3x'yfc56fH35|E8$+KGE@(u`7
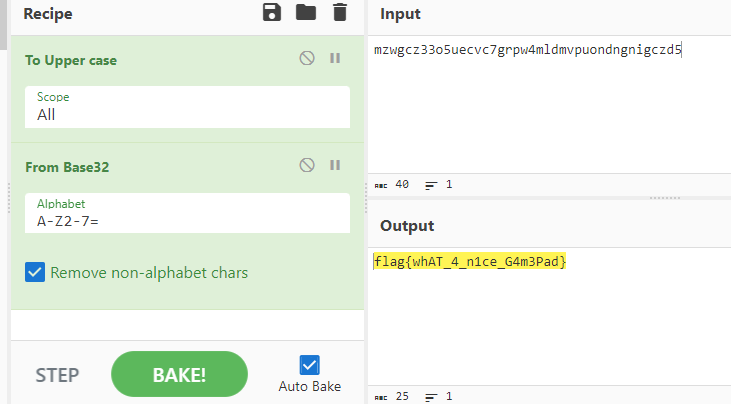
使用Cyberchef来解密:
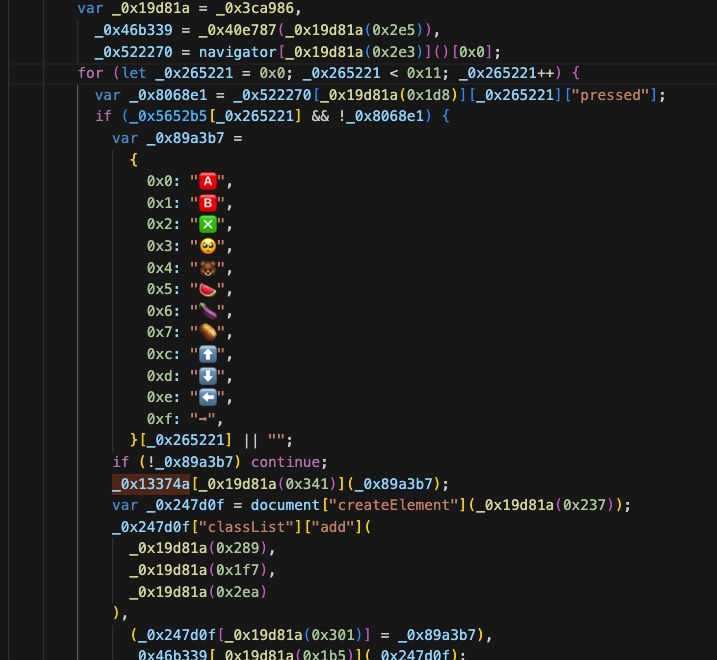
再访问127.0.0.1:2333,根据js和之前的模型文件,猜测要外接手柄。将手柄插到电脑上,显示连接成功。

发现手柄能输入的只有:
L 🐻
LT 🍆
R 🍉
RT 🥔
Y 🥺
⬆️⬇️⬅️➡️🅰️🅱️❎
根据js的映射表输入token
输入之后手柄接收到了震动信号,这里选择抓流量来捕获震动信号,最终发现流量里发送了flag。
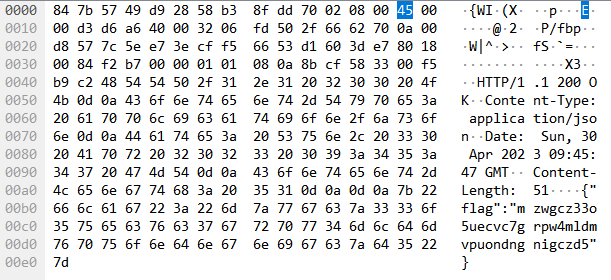
再次使用Cyberchef来解密:
最终本题由@1cePeak、@ThTsOd、@Dr34m、@Yunoon通力协作完成🎉
不得不说,我走过最长的路,就是出题人的套路。🤪